
Livestock
Run a preg check at the chute
In Vivetra: Livestock › Preg Checks
On this page
A preg-check session records a chute-side run at one operation: every animal's outcome, its breeding cycle and body condition, then a report you can hand the producer before you leave. It's built to work with no signal. Every tap is saved on the device straight away and syncs on its own when you're back in range.
By default, veterinarians and technicians can record preg checks. Everyone else can open a session read-only.
Start or resume a session
- Select Preg Checks in the Livestock menu.
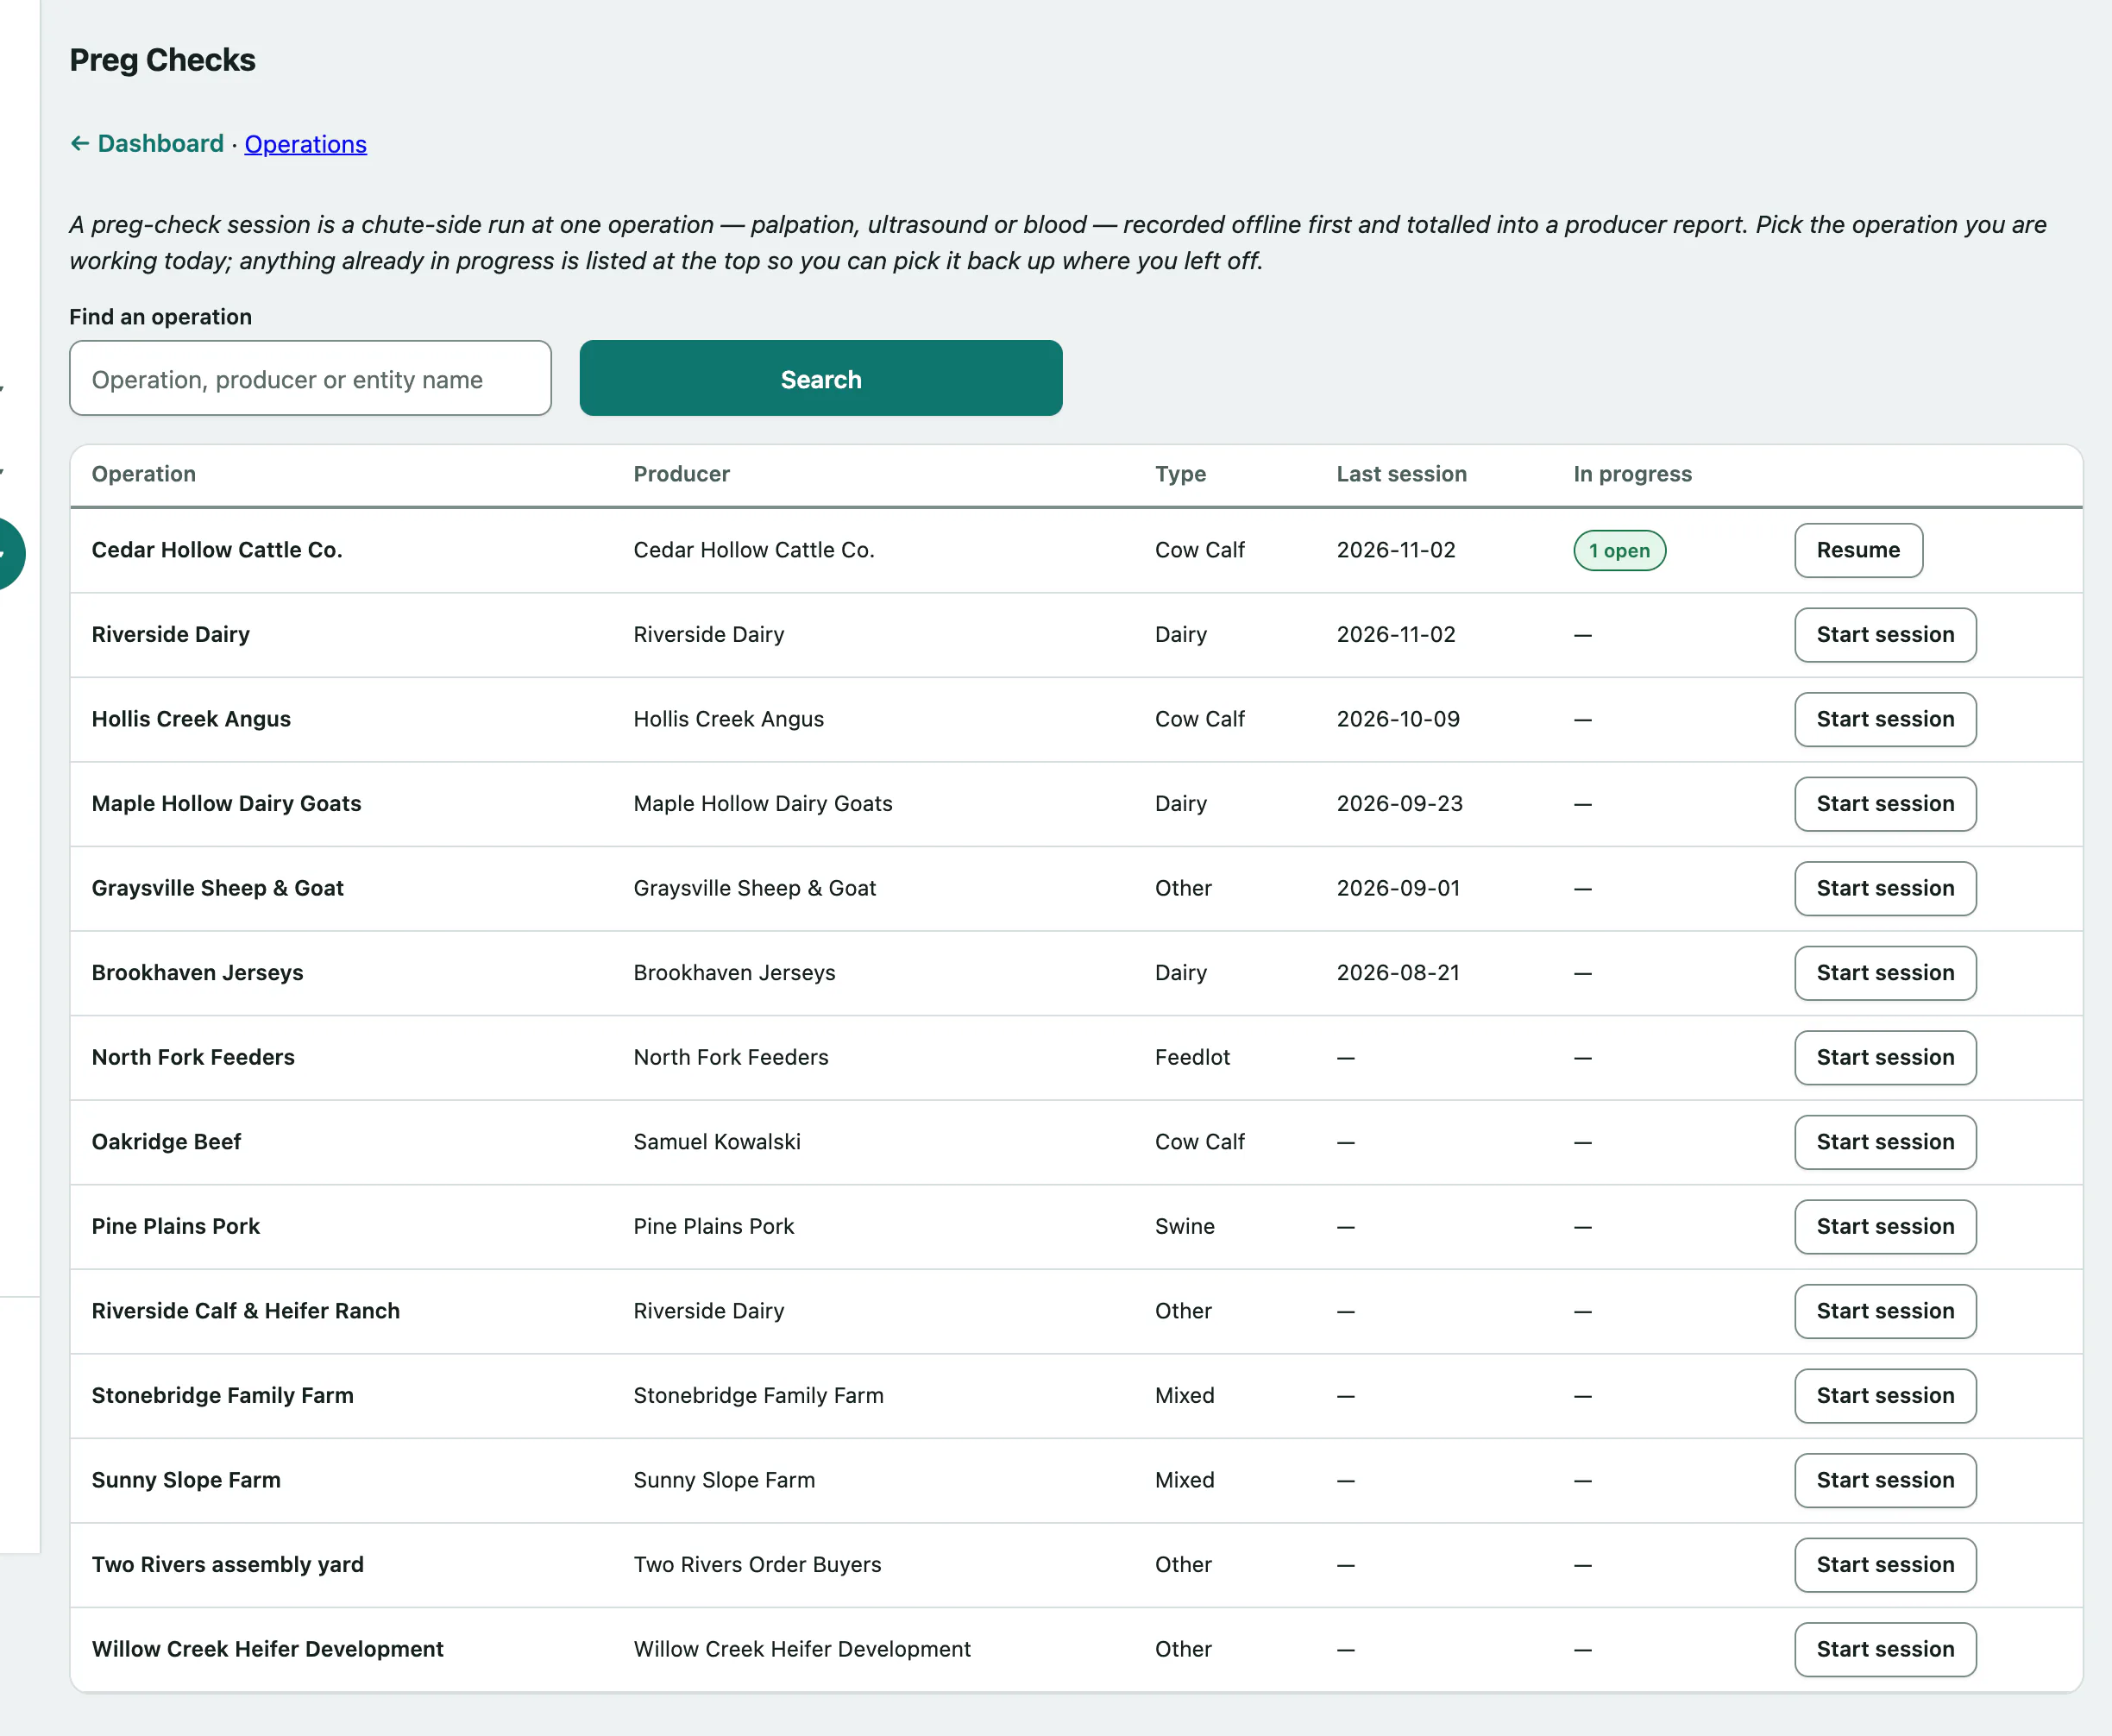
- To find the operation you're working today, type in Find an operation and select Search.
- On its row, select Start session. If the operation already has a session open, the button reads Resume, and the next screen lists the open sessions under Resume a session already open here.
You can also start from the operation's own page: Start or resume a preg-check session → under Pregnancy checks.
Fill in the session details
These describe the whole chute line. Fill them in before the first animal.
- Choose the Method: Palpation, Ultrasound, Blood Test or Other. Use one method for the whole line.
- Name the Herd / pasture / breeding group, or pick Or an existing lot.
- Enter the Bull in and Bull out dates, and the AI date if there was one.
- Select Start session. Once the session exists, the button reads Save session details.
Before you start, choose the Session veterinarian (each entry is credited to them unless you name another vet for that animal) and, if this is part of a planned visit, the Scheduled farm call.
The bull-in and bull-out dates narrow the cycle buttons to the 21-day cycles this herd could actually have bred in. Without a bull-in date, every cycle is offered.
Record each animal
The Entry section is made for wet hands and gloves: big buttons, one animal at a time.
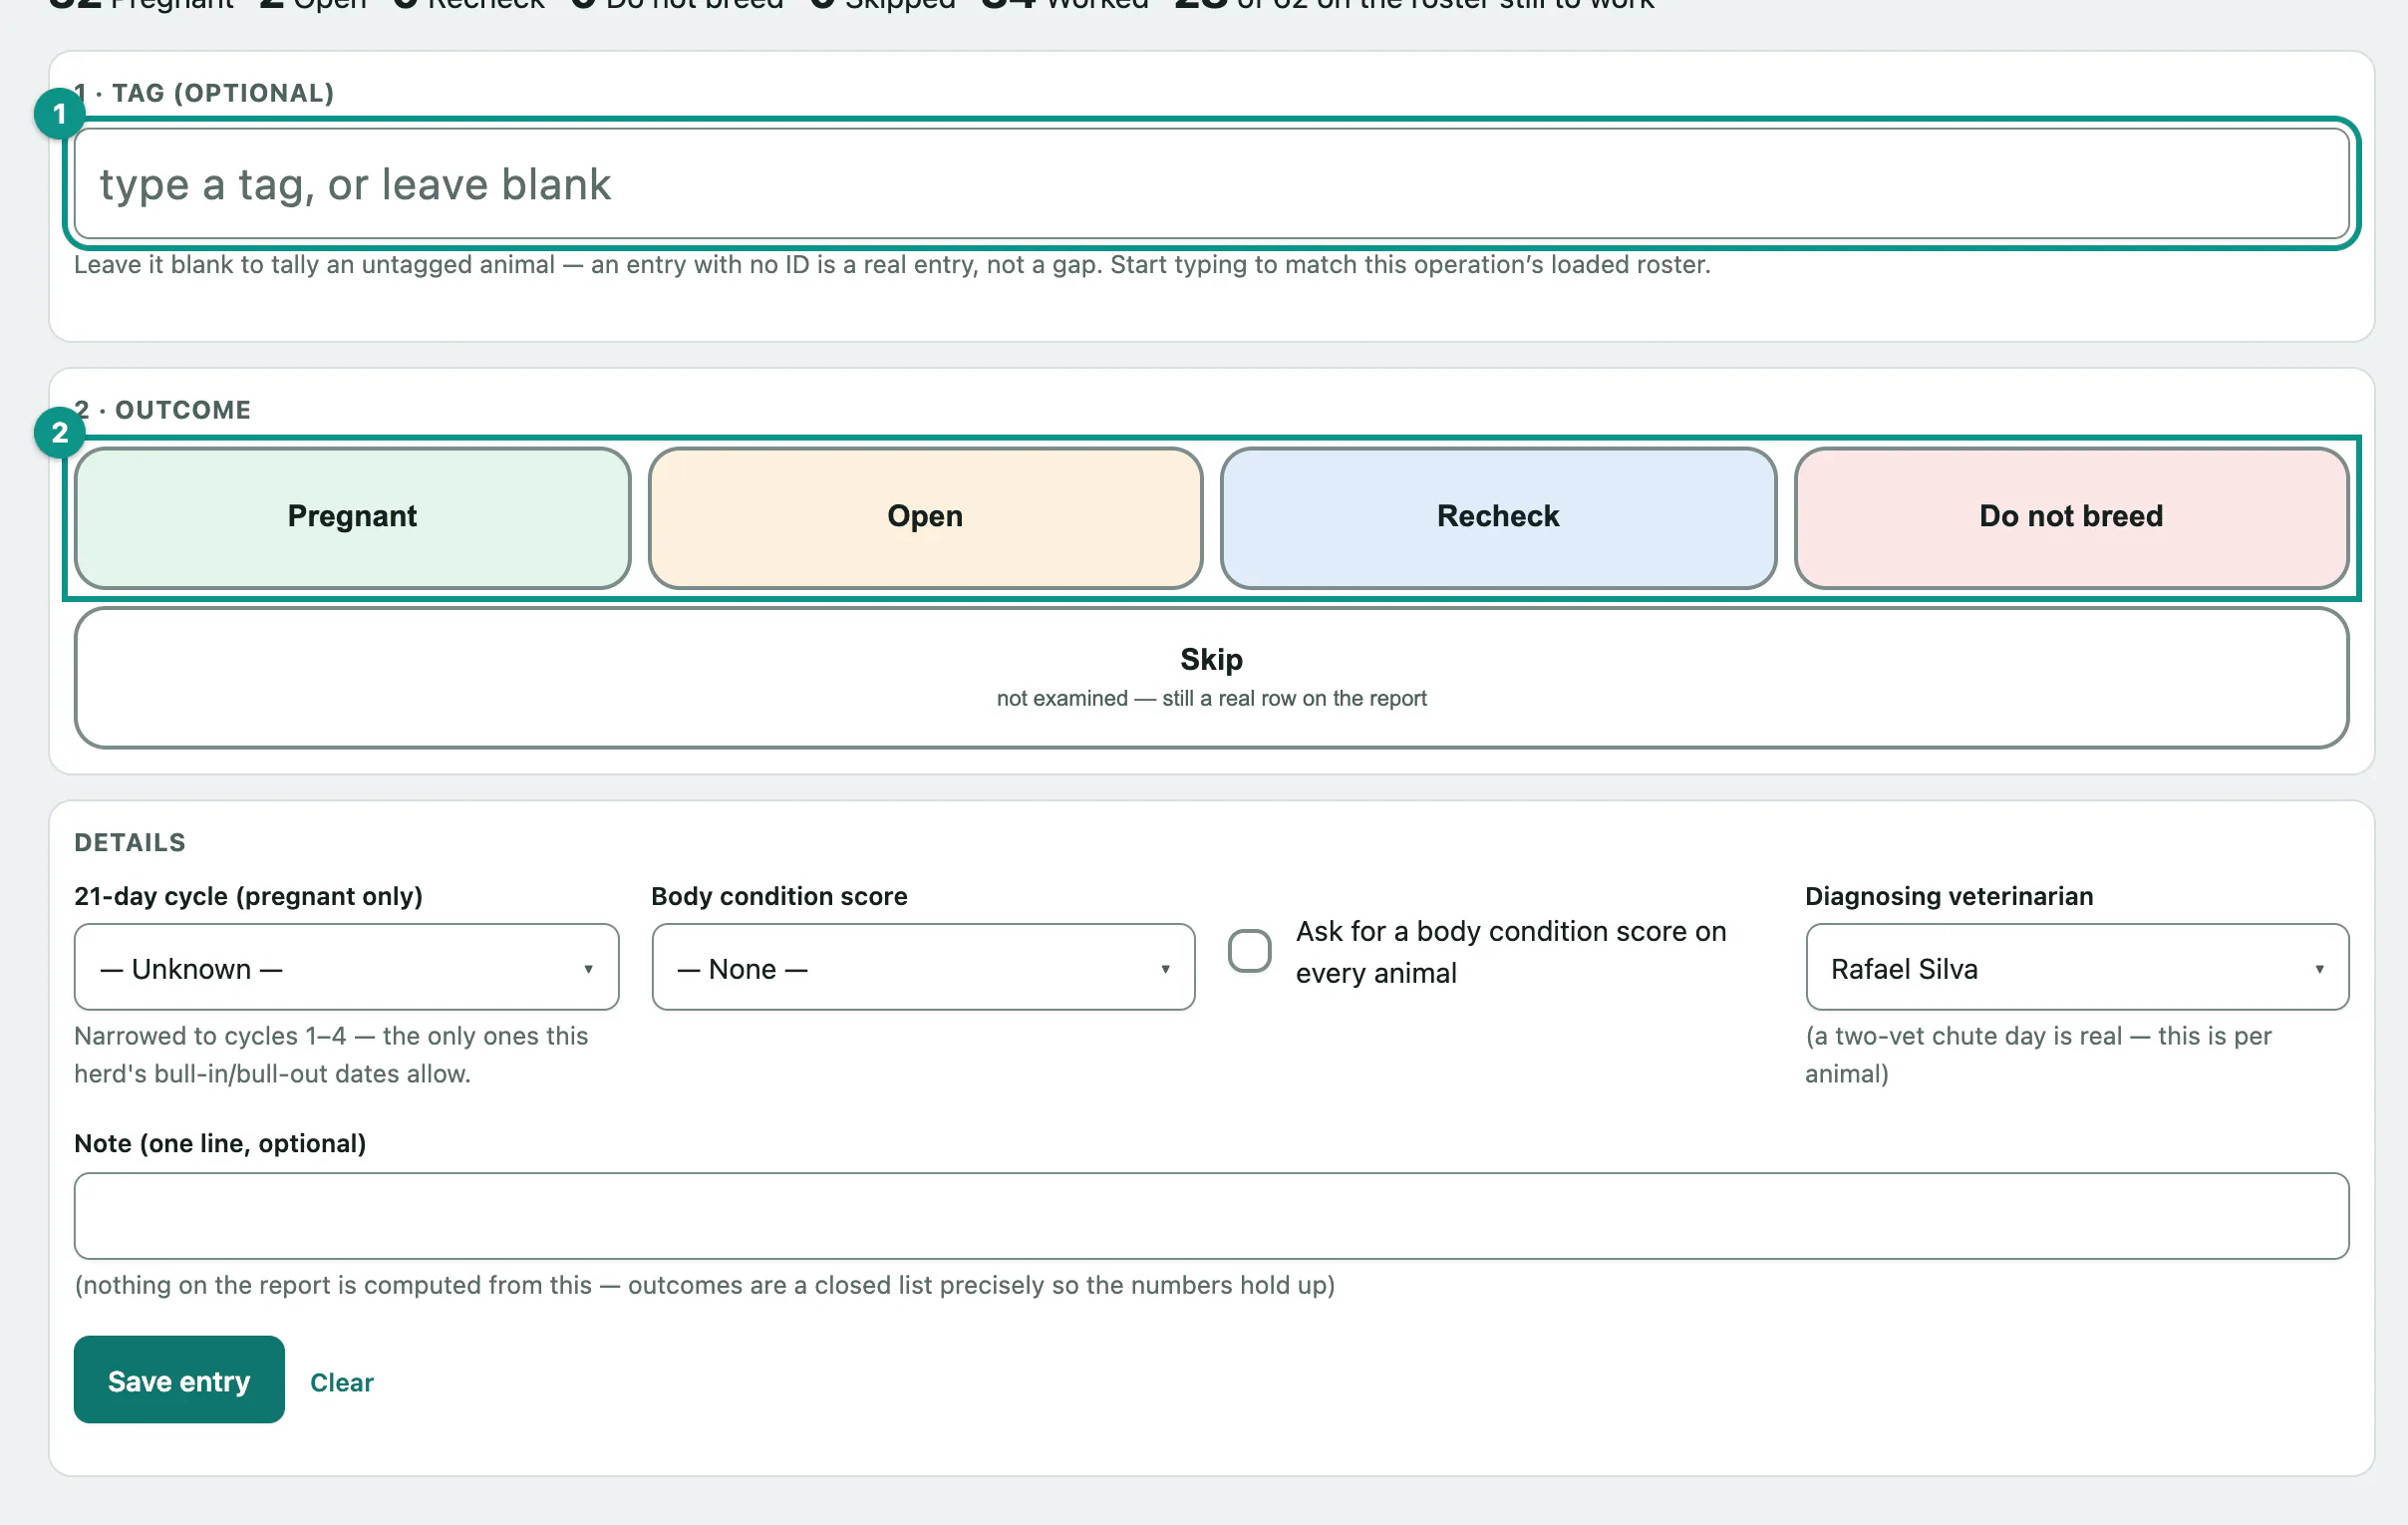
- Type the animal's tag under 1 · Tag (optional), or leave it blank for an untagged animal. If a roster is loaded, matching tags appear as you type.
- Tap the outcome: Pregnant, Open, Recheck or Do not breed. Tap Skip for an animal that went through without being examined.
- For a pregnant animal, tap the cycle under 3 · Which 21-day cycle, or Cycle unknown — save anyway.
- If you're scoring body condition, tap the score under 4 · Body condition (BIF 1–9). Tick Half point (adds ½ to the score you tap) for a half score, or tap No BCS — save now.
Every outcome except Pregnant saves on the first tap, unless you've asked for a body condition score. To score every animal, tick Ask for a body condition score on every animal under the details.
Under Details you can also set the cycle and score from lists, name a different Diagnosing veterinarian for this animal, add a one-line note, and select Save entry.
The running tally at the top of the pad updates with every entry.
Fix or undo an entry
Misfires happen. The Last few entries list shows the latest animals.
- Select Undo to cancel an entry. It stays on the record marked void and counts toward nothing.
- Select Fix to correct its tag, outcome, cycle, score or note, then Save correction.
You can fix or undo entries while the session is open. Nothing is ever deleted.
Give the producer their report
Below the pad, the report for the producer is built on the device from what you've recorded, so it works with no signal.
- Select Print / hand to producer now to print it. On a phone or tablet that supports sharing, a share button sits next to it.
To send a copy later, use Also send it when there is signal:
- Choose the Channel: Email or SMS.
- Check Send to. It's filled in from the producer's contact details.
- Select Queue the send.
The send goes out on its own once the device has a connection. Requested sends are listed with their status and any error. For the desk copy and re-sending later, see Print and send a preg-check report.
Close the session
- When the last animal is through, select Close this session.
Closing freezes the entries. Anything still queued on the device syncs afterwards and is still accepted. Once a session is closed, it can be billed (see Bill a farm client › Add a line item).
Pre-load a herd roster
A roster is an optional list of the animals you expect to work, loaded before the visit so the tablet can match tags at the chute with no signal. It's a convenience list, not a medical record: nothing on it gets a chart or patient file. A session works fine without one.
- Open the operation's page (see Set up farm clients, operations and premises › Open an operation) and select Pre-load the herd roster →.
- Paste the list into Paste one animal per line, one animal per line: tag, colour or marking, birth year, note. Only the tag is required. Commas or tabs both work, so you can paste straight from a spreadsheet.
- Or choose a file in …or choose a CSV file. It's read in your browser and dropped into the box; the file isn't uploaded.
- Select Load roster.
You can also choose a Lot (optional) for every animal in the load. It's applied to animals already on the roster too, so reloading with it blank clears their lot.
If any line can't be read, nothing is loaded. The page lists the bad lines and keeps your paste so you can fix them. Loading the same list twice is safe: tags already on the roster are updated, not duplicated.
To add a single animal, fill in Tag under Add one animal and select Add to roster.
Under Roster, search with Find a tag, edit a row and select Save, or select Mark removed for an animal that isn't in this working group. Removed animals can be restored; nothing is deleted.